Feb 9, 2016 - 36 Comments
Though we’d all rather everything works as intended with our Macs,
occasionally something goes really haywire and OS X becomes either
royally messed up or unusable. In these circumstances, sometimes the
only solution to get things working again is to reinstall OS X system
software (or, if you have a recent safe backup made, restoring from Time Machine is often valid as well).
We’ll cover how to reinstall Mac OS X system software only
with Recovery Mode, this reinstalls the most recently available version
of OS X that is (or was) actively running on the Mac. If performed
correctly as described, applications and user data will be preserved and
not be modified at all, since this approach only reinstalls the
operating system and system files.
Update: this article pertains specifically to
reinstalling OS X on Macs, including El Capitan, Yosemite, and
Mavericks. Newer MacOS releases also support the ability to re-install
only macOS while leaving user files alone, however. If interested you
can read how for macOS Mojave and High Sierra and Sierra. The premise is mostly the same; booting into Recovery mode to reinstall the system software.
Note how this is different from re-installing
OS X with Internet Recovery, which loads entirely from the internet,
and then reinstalls the original version of OS X which came with the Mac
instead, that method is sometimes necessary if the standard
recovery option doesn’t load, or if you want to reinstall the original
version of OS X for the computer in question. This is also completely
different from a clean install of OS X, which is performed by erasing a
Mac drive and then starting fresh with a new clean installation of the
Mac OS X system software.
Before getting started, you’ll want to be sure you have a fast and
stable internet connection available for the Mac, this is because the
installer files for OS X download from Apple. Trying to reinstall OS X
through a flakey or slow internet connection is not recommended, unless
you were to use a bootable install drive or something similar where
downloading reinstallation components is not necessary. You’ll also want
to set aside at least an hour or two to complete this process, the
exact time it takes depends on the speed of the internet connection in
use, and the speed of the Mac.
Reinstalling OS X System Software on a Mac with Recovery Mode
It’s a good idea to back up the Mac with Time Machine before beginning this process. Even though this method aims to only reinstall OS X system software on the Mac, things could still go wrong and it’s always better to lean on the side of caution and make file backups beforehand.
- Reboot the Mac and hold down the Command+R keys until you see the
loading screen to signify you are entering into System Recovery

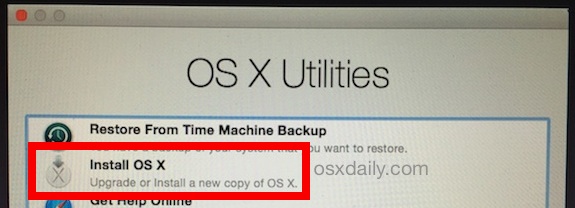
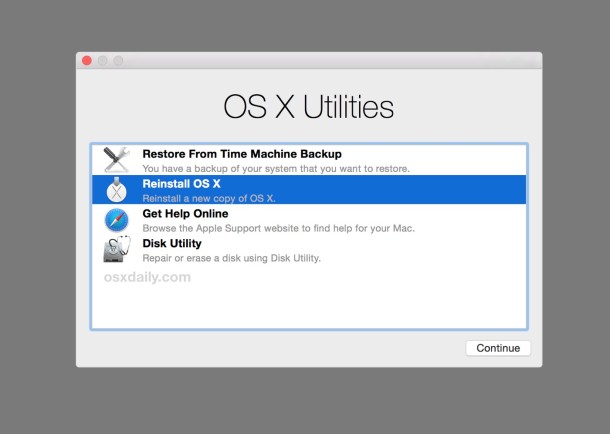
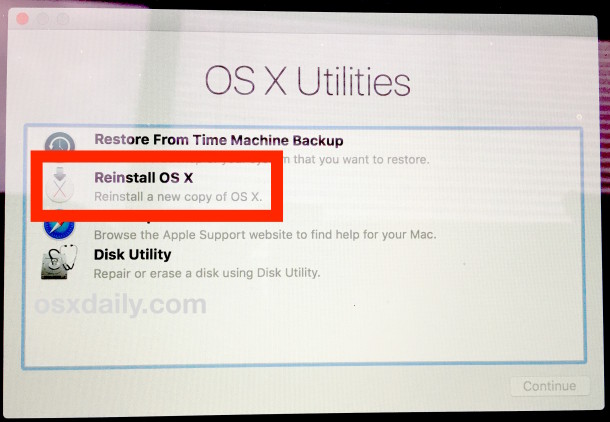
- When you see the OS X “Utilities” menu, you should connect the Mac
to the internet however you normally do – this is required* to download
the OS X installer app:
- For wi-fi connections, go to the upper right corner of the screen and pull down the wireless menu and join the network of choice
- If the Mac uses wired ethernet, simply plug in the ethernet cable and DHCP should retrieve details for the network connection
- Once the Mac is connected to the internet, from the OS X Utilities screen choose “Reinstall OS X”
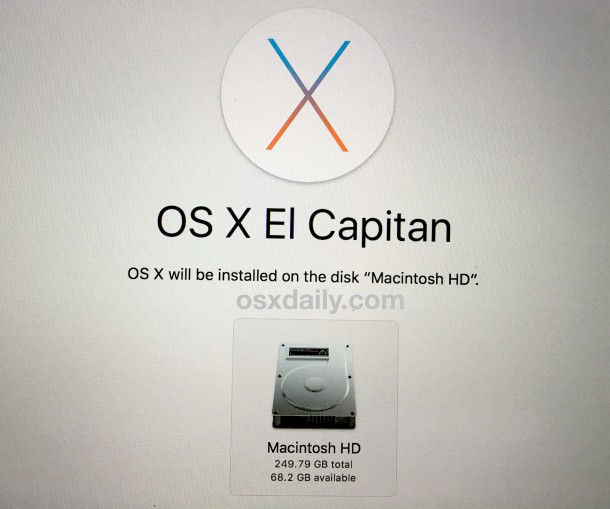
- Select the target hard drive to re-install OS X onto (typically
“Macintosh HD” but varies per user) – if the Mac has a FileVault
password set choose to “Unlock” and enter the FileVault encryption
password before proceeding further
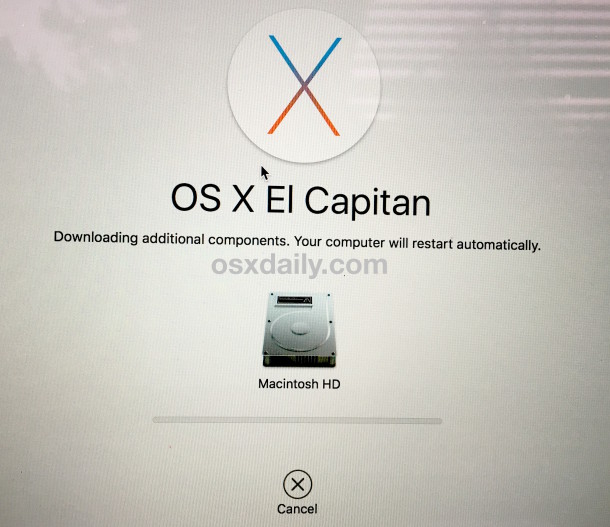
- The Recovery drive will now download “additional components”
necessary to reinstall OS X on the target volume, let this process
complete and the Mac will automatically reboot itself when done
- You may encounter a user login screen upon first reboot, login to
the admin user account as usual, and the Mac will again reboot itself to
start the reinstallation process of Mac OS X system software
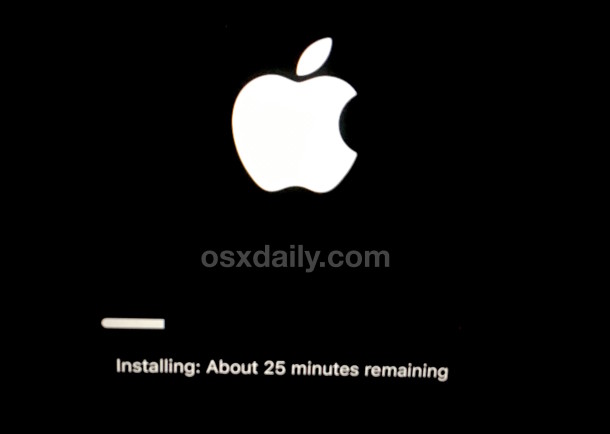
- At the black screen with an Apple logo, you’ll see a progress bar
indicating how much time is left to complete the reinstallation of Mac
OS X, this is typically somewhere in the realm of an hour, just let the
Mac sit and finish
When reinstallation completes, the Mac will reboot itself again as
normal, and you’ll be presented again with the typical login screen
associated with OS X – log in to your user account as usual and
everything should be in order, complete with a new install of OS X
system software on the computer.
As long as you didn’t erase the drive or delete any user accounts
yourself, all user accounts, installed applications, and user data will
be preserved, and only Mac OS X system software and system files will have been reinstalled
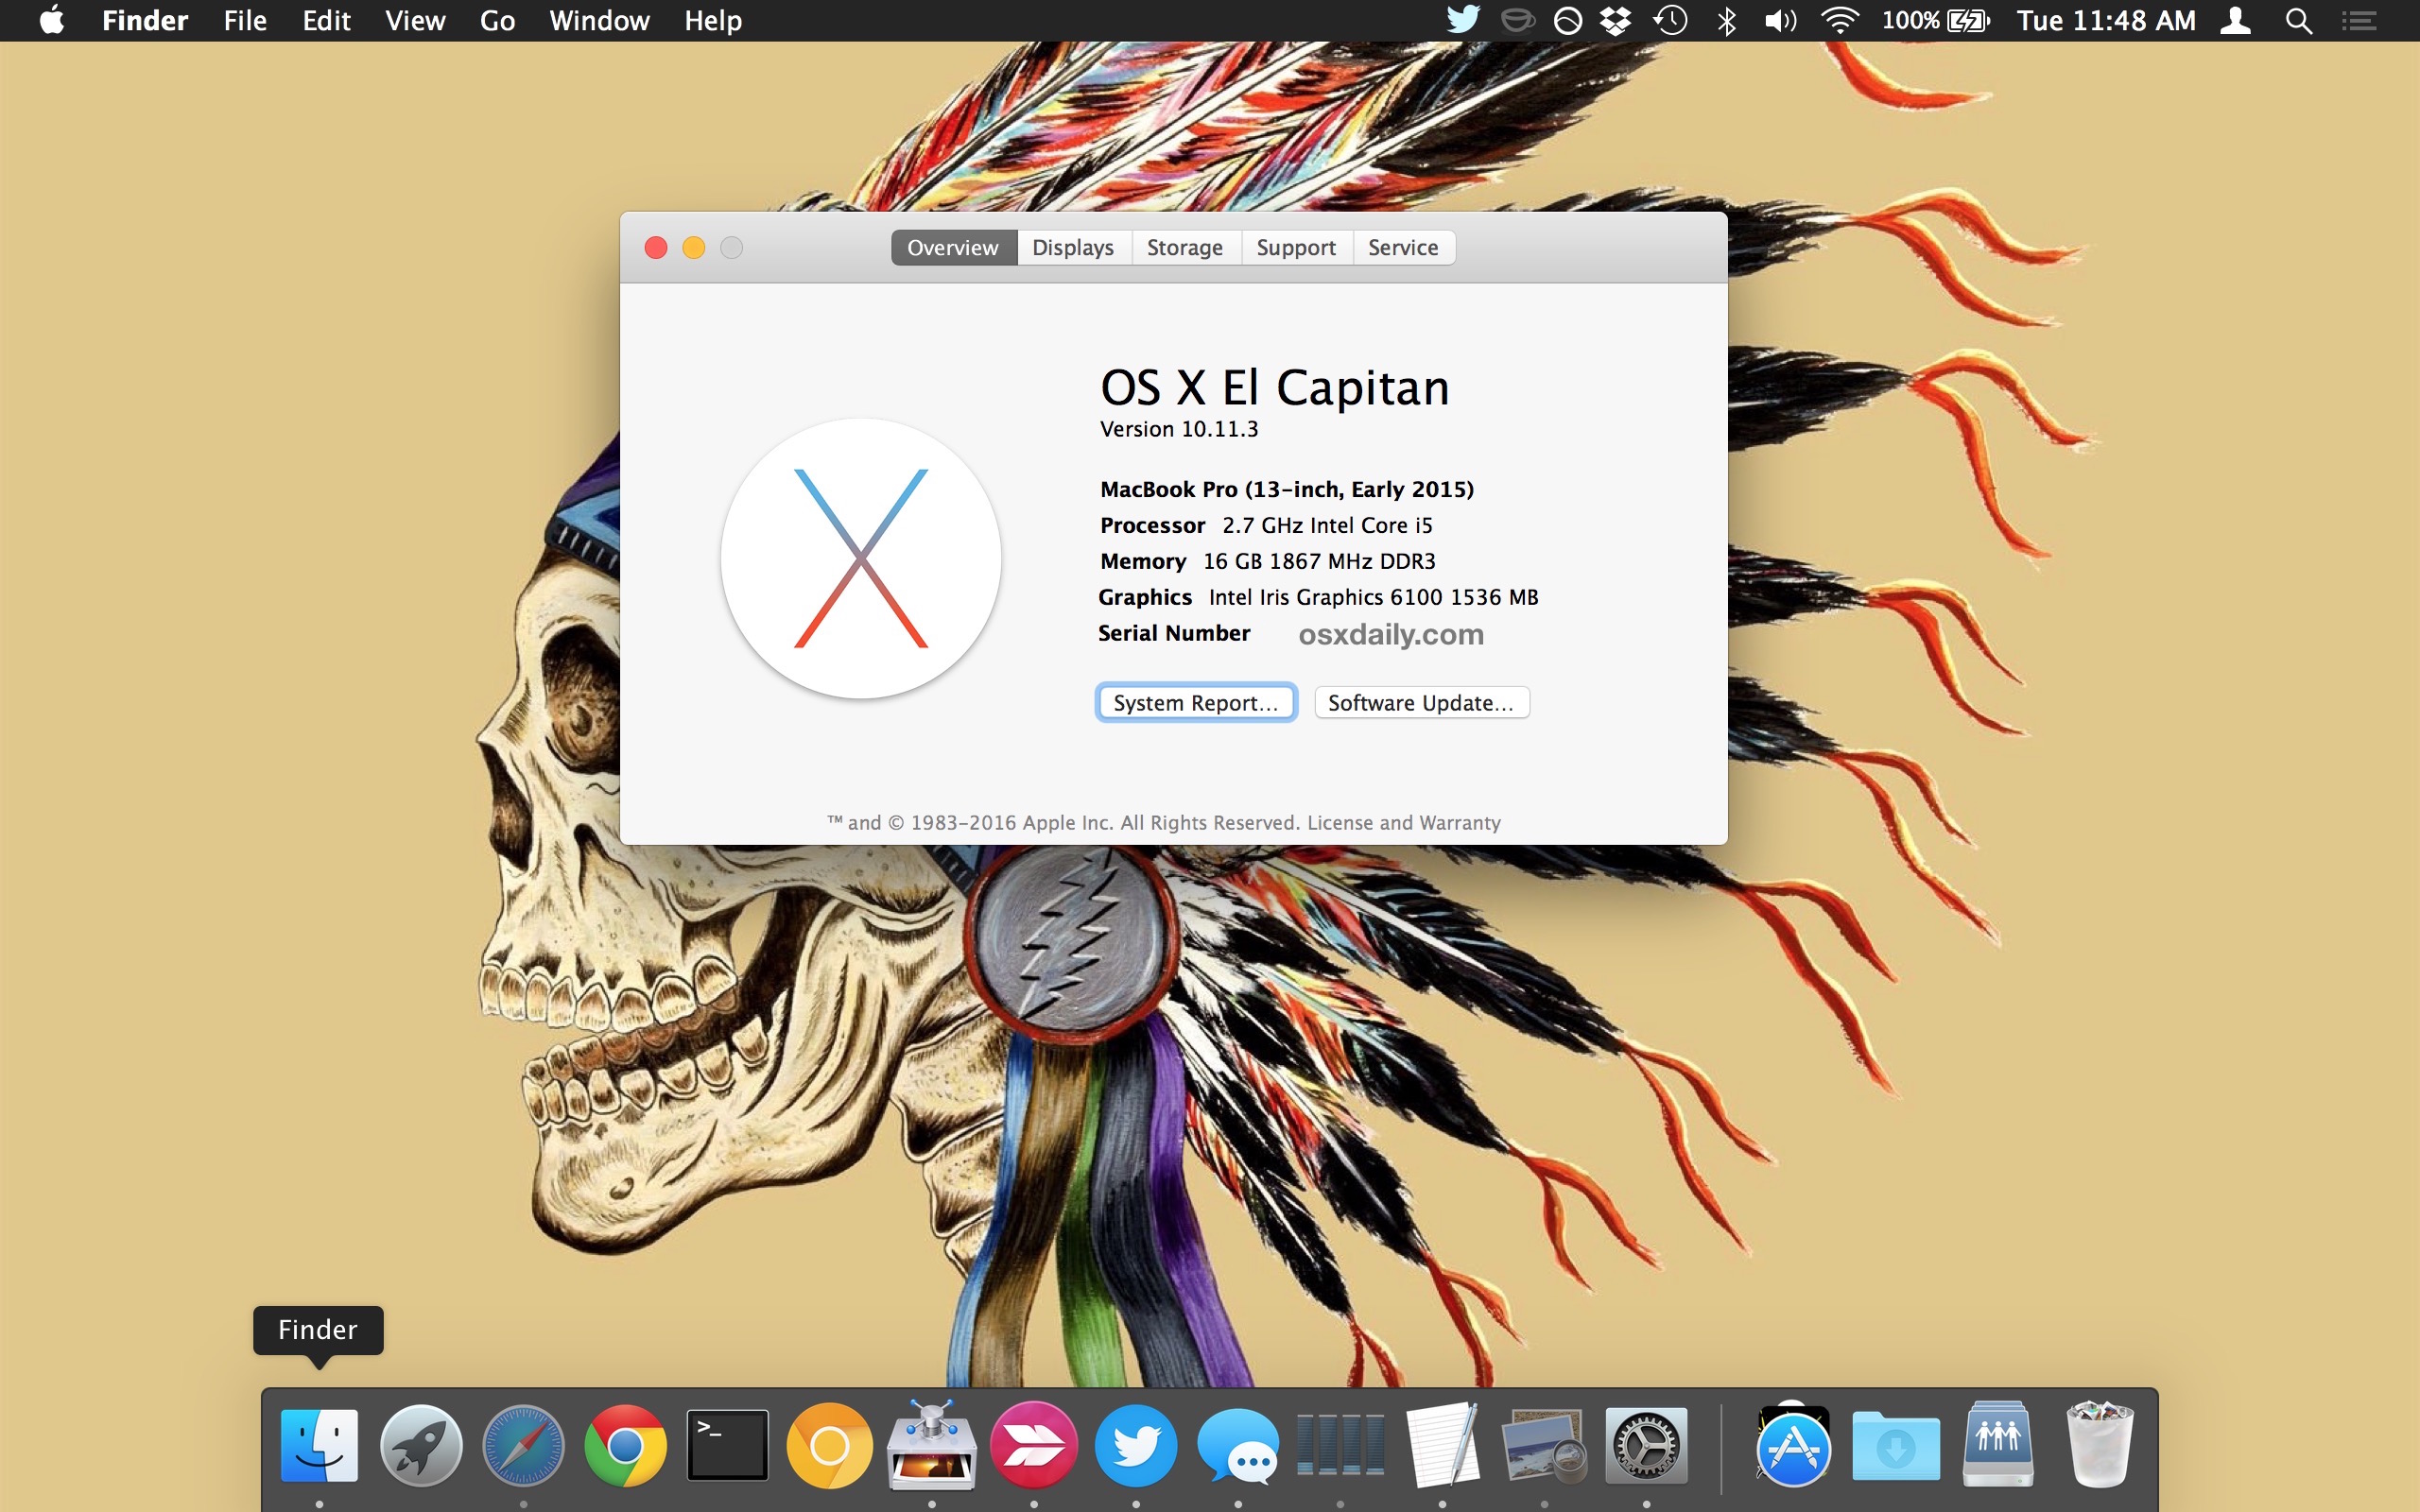
without touching anything else on the Mac. If desired, you can use the
Apple menu > About This Mac screen to verify the version of OS X
that has been reinstalled:
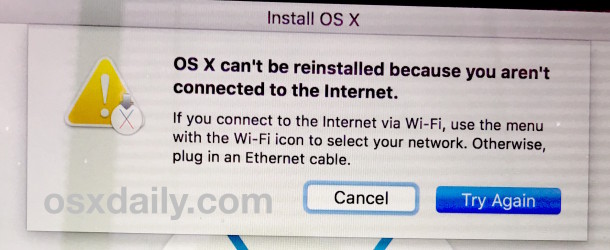
* If you get an error message about being unable to reinstall OS X
because the Mac isn’t connected to the internet, you need to join a
wi-fi network or connect via ethernet. The installer must download from
Apple for this to work.
This works to reinstall OS X exactly as described, I had to run through this process recently when I encountered probably the worst and most bizarre bugs I’ve ever seen in OS X,
where “Macintosh HD” became stuck in the Trash can and actually started
deleting system level files when emptied, which as you can imagine
leads to all sorts of problems with the operating system missing
critical components. While it’s unlikely you’ll ever encounter such a
bug yourself, it is possible for users to mess up their system folders
if they have disabled SIP or are using root, if the startup Mac OS
volume has been erased or misplaced, if a prohibitory symbol is
encountered at startup (sometimes a folder with an X through it, or a
folder with a blinking question mark), or if the OS X installation is
erroneous or royally messed up.
Remember, this method is not the same as a clean install, and it only reinstalls the version of OS X that is currently running on the Mac (shown here with El Capitan), whereas Internet Recovery will reinstall the version of OS X that shipped with the Mac
(in this case it would have been Yosemite) instead. Obviously the
versions of OS X will vary depending on what came with the Mac, and what
the Mac is currently running.
While this article describes this system reinstall process with OS X versions specifically, you can also read how to re-install only macOS Mojave while leaving user files alone and for re-installing MacOS High Sierra and Sierra
in the same way too. The premise is mostly the same; booting into
Recovery mode to reinstall the system software. Regardless of what Mac
or Mac OS version you are trying this with, always backup the computer
beforehand.
Related


How to Reinstall OS X on a Mac
Though we’d all rather everything works as intended with our Macs,
occasionally something goes really haywire and OS X becomes either
royally messed up or unusable. In these circumstances, sometimes the
only solution to get things working again is to reinstall OS X system
software (or, if you have a recent safe backup made, restoring from Time Machine is often valid as well).
We’ll cover how to reinstall Mac OS X system software only
with Recovery Mode, this reinstalls the most recently available version
of OS X that is (or was) actively running on the Mac. If performed
correctly as described, applications and user data will be preserved and
not be modified at all, since this approach only reinstalls the
operating system and system files.
Update: this article pertains specifically to
reinstalling OS X on Macs, including El Capitan, Yosemite, and
Mavericks. Newer MacOS releases also support the ability to re-install
only macOS while leaving user files alone, however. If interested you
can read how for macOS Mojave and High Sierra and Sierra. The premise is mostly the same; booting into Recovery mode to reinstall the system software.
Note how this is different from re-installing
OS X with Internet Recovery, which loads entirely from the internet,
and then reinstalls the original version of OS X which came with the Mac
instead, that method is sometimes necessary if the standard
recovery option doesn’t load, or if you want to reinstall the original
version of OS X for the computer in question. This is also completely
different from a clean install of OS X, which is performed by erasing a
Mac drive and then starting fresh with a new clean installation of the
Mac OS X system software.
Before getting started, you’ll want to be sure you have a fast and
stable internet connection available for the Mac, this is because the
installer files for OS X download from Apple. Trying to reinstall OS X
through a flakey or slow internet connection is not recommended, unless
you were to use a bootable install drive or something similar where
downloading reinstallation components is not necessary. You’ll also want
to set aside at least an hour or two to complete this process, the
exact time it takes depends on the speed of the internet connection in
use, and the speed of the Mac.
Reinstalling OS X System Software on a Mac with Recovery Mode
It’s a good idea to back up the Mac with Time Machine before beginning this process. Even though this method aims to only reinstall OS X system software on the Mac, things could still go wrong and it’s always better to lean on the side of caution and make file backups beforehand.
- Reboot the Mac and hold down the Command+R keys until you see the
loading screen to signify you are entering into System Recovery
- When you see the OS X “Utilities” menu, you should connect the Mac
to the internet however you normally do – this is required* to download
the OS X installer app:
- For wi-fi connections, go to the upper right corner of the screen and pull down the wireless menu and join the network of choice
- If the Mac uses wired ethernet, simply plug in the ethernet cable and DHCP should retrieve details for the network connection
- Once the Mac is connected to the internet, from the OS X Utilities screen choose “Reinstall OS X”
- Select the target hard drive to re-install OS X onto (typically
“Macintosh HD” but varies per user) – if the Mac has a FileVault
password set choose to “Unlock” and enter the FileVault encryption
password before proceeding further
- The Recovery drive will now download “additional components”
necessary to reinstall OS X on the target volume, let this process
complete and the Mac will automatically reboot itself when done
- You may encounter a user login screen upon first reboot, login to
the admin user account as usual, and the Mac will again reboot itself to
start the reinstallation process of Mac OS X system software
- At the black screen with an Apple logo, you’ll see a progress bar
indicating how much time is left to complete the reinstallation of Mac
OS X, this is typically somewhere in the realm of an hour, just let the
Mac sit and finish
When reinstallation completes, the Mac will reboot itself again as
normal, and you’ll be presented again with the typical login screen
associated with OS X – log in to your user account as usual and
everything should be in order, complete with a new install of OS X
system software on the computer.
As long as you didn’t erase the drive or delete any user accounts
yourself, all user accounts, installed applications, and user data will
be preserved, and only Mac OS X system software and system files will have been reinstalled
without touching anything else on the Mac. If desired, you can use the
Apple menu > About This Mac screen to verify the version of OS X
that has been reinstalled:
* If you get an error message about being unable to reinstall OS X
because the Mac isn’t connected to the internet, you need to join a
wi-fi network or connect via ethernet. The installer must download from
Apple for this to work.
This works to reinstall OS X exactly as described, I had to run through this process recently when I encountered probably the worst and most bizarre bugs I’ve ever seen in OS X,
where “Macintosh HD” became stuck in the Trash can and actually started
deleting system level files when emptied, which as you can imagine
leads to all sorts of problems with the operating system missing
critical components. While it’s unlikely you’ll ever encounter such a
bug yourself, it is possible for users to mess up their system folders
if they have disabled SIP or are using root, if the startup Mac OS
volume has been erased or misplaced, if a prohibitory symbol is
encountered at startup (sometimes a folder with an X through it, or a
folder with a blinking question mark), or if the OS X installation is
erroneous or royally messed up.
Remember, this method is not the same as a clean install, and it only reinstalls the version of OS X that is currently running on the Mac (shown here with El Capitan), whereas Internet Recovery will reinstall the version of OS X that shipped with the Mac
(in this case it would have been Yosemite) instead. Obviously the
versions of OS X will vary depending on what came with the Mac, and what
the Mac is currently running.
While this article describes this system reinstall process with OS X versions specifically, you can also read how to re-install only macOS Mojave while leaving user files alone and for re-installing MacOS High Sierra and Sierra
in the same way too. The premise is mostly the same; booting into
Recovery mode to reinstall the system software. Regardless of what Mac
or Mac OS version you are trying this with, always backup the computer
beforehand.
Related articles: